

Welcoming a new baby into your life is a whirlwind of joy, and nesting by decorating their nursery is one of the most magical parts. You can create a beautiful, personalised space by learning how to hang pictures without damaging walls, using simple, parent-friendly tools like adhesive strips and removable hooks instead of nails or screws. This approach is perfect for families, especially those renting, who want to avoid permanent marks on the walls.
Creating Your Dream Nursery Without Wall Damage
Decorating your child's first room should be exciting, not stressful. But the thought of drilling into plaster or leaving behind stubborn holes can really put a damper on the fun. This is especially true if you're in a rental property or simply want the freedom to change things up as your little one grows.
The good news is, creating a stunning gallery wall filled with sweet animal prints and personalised art is easier than ever. And it doesn't have to cost you your security deposit!
Modern solutions offer the freedom to design a space that can grow and change right alongside your child. Just imagine swapping out those baby animal watercolours for their first scribbled masterpieces from nursery, all without ever picking up a drill.
A Flexible Approach for Evolving Tastes
Children's interests change in the blink of an eye. The safari theme that was perfect for your newborn might soon be replaced by a roaring love for dinosaurs or superheroes. Damage-free hanging methods give you the ultimate flexibility to keep up.
- Easy Updates: Swap pictures, frames, and layouts in minutes.
- Stress-Free Moves: When it's time to move house, you can leave the walls as pristine as you found them.
- Safe and Secure: Many options are designed to be safe for a child's environment. When choosing your supplies, you might consider options like sustainable adhesives and sealants that are mindful of both your walls and your family's well-being.
For those of you just starting to plan your decor, exploring various nursery wall art ideas can provide wonderful inspiration for creating that perfect, cosy atmosphere.
By choosing reversible decorating methods, you're not just protecting your walls; you're giving yourself the creative freedom to celebrate every new phase of your child's life without hesitation or hassle. This guide will show you exactly how to get started.
Choosing the Right Method for Your Walls
Before you get carried away hanging those adorable animal prints, it’s worth taking a moment to figure out what kind of walls you're actually working with. Not every hanging method is a one-size-fits-all solution, and what works beautifully on modern plasterboard could be a total disaster for the charming but delicate plaster walls you often find in older UK homes.
Getting this right from the start is the real secret to hanging pictures without leaving a trail of damage behind.
Your home's age and construction play a huge part in your decorating game plan. Most modern homes have plasterboard (often called drywall), which is pretty forgiving. But if you’re in an older property, you might be dealing with traditional lath and plaster, which is much more brittle and notorious for cracking under pressure.
Identifying Your Wall Type
Not sure what you've got? The simple knock-knock test is surprisingly reliable.
Just tap the wall with your knuckle. If you hear a hollow, drum-like sound, you’re almost certainly dealing with plasterboard. If it’s a dull, solid thud with hardly any give, then you've likely got proper plaster or even a solid brick wall.
For parents in homes built before the 1970s, this is a crucial step. A staggering 68% of UK homeowners have reported wall damage from trying to hang pictures, mostly because of how unforgiving old plaster can be. Banging a standard nail into these surfaces causes tiny cracks in around 75% of cases, which can lead to frustrating and expensive repairs down the line. It's why specialised plaster hooks are so often recommended—they can reduce the risk of damage by up to 90%.
Matching the Method to the Surface
Once you know your wall type, picking the right hanging method is easy.
- For Plasterboard (Drywall): You've got the most flexibility here. Adhesive strips and removable hooks are perfect for lightweight frames, like the ones in our nursery collections.
- For Lath and Plaster: Whatever you do, avoid nails! Specialised plaster picture hooks are your best friend. They use a hardened pin that goes into the wall at a steep angle, using the wall’s own structure for support without causing cracks.
- For Brick or Tile: If you’re decorating a playroom or kitchen, you might come up against harder surfaces. Drilling is off the table if you want to avoid permanent damage. Look for heavy-duty adhesive solutions designed specifically for rough or uneven textures.
This little flowchart is a great way to quickly decide on the best approach based on how heavy your artwork is.
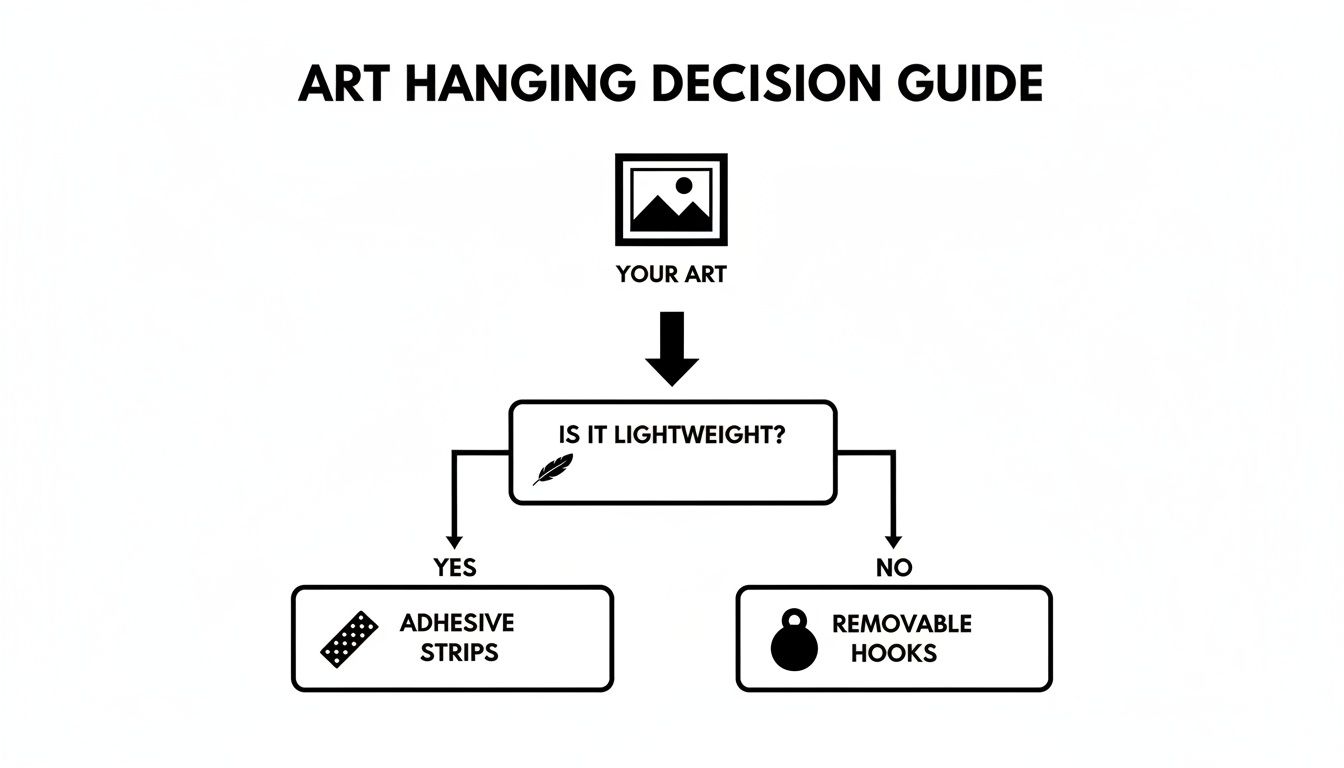
The main takeaway here is that the weight of your frame is the first thing you need to think about. It’ll point you towards either simple adhesive strips or stronger removable hooks for a secure, damage-free display.
Choosing the correct hanging method for your specific wall isn't just about preventing damage—it's about ensuring the art stays securely in place, which is a critical safety consideration in any child's room. Taking a moment to assess your walls will save you time, money, and stress down the line.
With the right know-how, you can confidently create beautiful displays of children's wall decor that are both stylish and completely reversible.
Your Toolkit for Damage-Free Hanging
Okay, now that you've got a handle on what kind of walls you’re working with, it's time to gather your supplies. Knowing how to hang pictures without wrecking your walls isn't about having a massive toolbox. It’s about choosing the right, parent-friendly products. We're about to dive into the heroes of damage-free decorating, making sure every lovely print in your child's room goes up with ease and comes down without a trace.
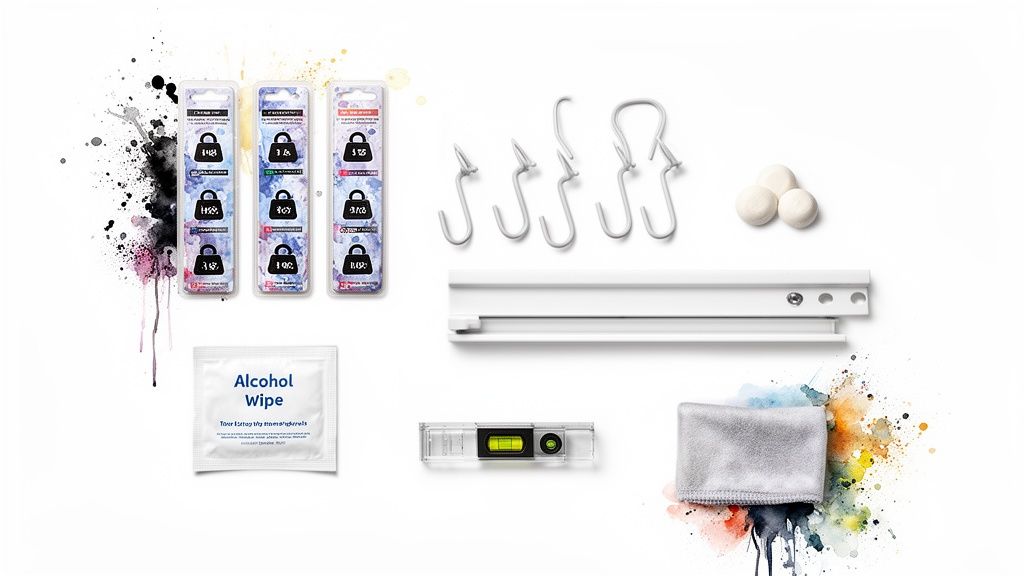
Thankfully, the market is brimming with clever solutions designed for exactly this situation. From adhesive strips that honestly feel like magic to elegant rail systems, you have plenty of brilliant options that don't involve a single nail or screw. This is fantastic news for any parent who wants the flexibility to update the decor as their little one's tastes change from safari animals to superheroes.
The Power of Adhesive Strips and Hooks
Adhesive strips are a complete game-changer, especially for lightweight nursery art. These genius little strips work using a stretch-release technology, which means the bond is incredibly strong when you need it to be but releases cleanly when you gently pull the tab. They are absolutely perfect for creating a gallery wall of Pompom Prints without leaving a single hole.
For items that are a bit heavier or for frames that come with wire backs, removable hooks are a great alternative. They use the exact same adhesive magic but give you a traditional hook to hang your art from. Just be sure to always, always check the weight limit on the packaging—it's your most important guide! A standard pack can often hold frames up to 7.2kg (16 pounds), which is more than enough for most children's artwork.
Pro Tip: A little bit of prep goes a long way. Before sticking anything on the wall, give the surface a quick wipe with a lint-free cloth and a bit of rubbing alcohol. This simple step removes any dust or grease that could weaken the bond, making sure your art stays put.
Comparing Adhesive Strips vs Removable Hooks
So, strips or hooks? The choice often comes down to the specific frame you're trying to hang. To make it a bit easier, here’s a quick head-to-head comparison of the two most popular damage-free solutions for nurseries.
| Feature | Adhesive Strips (e.g., Command Strips) | Removable Hooks (e.g., Command Hooks) |
|---|---|---|
| Best For | Flat-backed frames, canvases, and getting that flush-to-the-wall, professional look. | Frames that already have a wire or sawtooth hanger attached on the back. |
| Application | Two strips click together—one sticks to the frame and the other to the wall. Simple. | A single adhesive strip is applied to the back of the hook's base before pressing it to the wall. |
| Weight Capacity | Varies by size, usually from 1kg up to 9kg for the larger, heavy-duty strips. | Ranges from tiny hooks holding 225g up to beefier options that can handle 7kg+. |
| Visual Profile | Completely hidden! They give your artwork a really clean, floating appearance. | The hook itself is visible, although clear and decorative options are widely available. |
Both are fantastic choices and can save you a lot of hassle (and filler!). For most of our lightweight prints, the strips are our go-to for that seamless look.
The Ultimate Flexible Solution: Picture Hanging Rails
If you’re renting or you're a parent who just adores rearranging your child’s room, a picture hanging rail system is an incredible investment. The idea is simple: you install a single, slim track along the top of your wall, right near the ceiling. From this track, you can drop down clear cords or sleek metal rods that have adjustable hooks.
The real beauty of this system is the complete freedom it offers. You can slide pictures left and right, move them up and down, and swap out entire displays whenever you fancy it—all without ever touching the wall again. It’s the perfect setup for an evolving gallery wall that showcases your child’s latest masterpieces from school right alongside your favourite prints.
A Renter's Guide to Nursery Wall Decor
Creating a warm, personal nursery when you're renting comes with a big challenge: keeping that security deposit safe. For parents, this usually means finding clever ways to hang pictures without leaving a single mark. Learning how to put art on the walls without damage isn't just a preference—it can be a financial necessity.
Thankfully, you don't have to choose between beautiful walls and getting your money back. The key is to get familiar with non-invasive techniques that are completely reversible. These methods are your secret weapon for creating a gorgeous space that can change as your child grows, from a sleepy newborn to a toddler with very strong opinions on dinosaurs.
The Renter's Best Friend: Adhesive Solutions
For lightweight nursery art, adhesive strips and hooks are the absolute champions. They give you a surprisingly strong hold without the commitment of nails or screws, making them perfect for rental properties.
This is especially true in the UK, where there are 4.6 million private rental households and tenants often face strict no-damage clauses. A huge 52% of renters report deductions for picture hook holes, with an average cost of £120.
Good quality adhesive solutions, like Command Hooks, have been tested by the British Standards Institution (BSI). Their trials showed these hooks can hold up to a 4.5kg frame on painted plaster for over a year, leaving no residue in 98% of cases. This makes them a really reliable choice for hanging Pompom's curated bundles, letting you create a stunning mix-and-match gallery wall with zero tools. For more tips, check out hanging posters without fuss on my-picture.co.uk.
Creative Ideas Beyond Hooks
While adhesive hooks are fantastic, they aren't your only option for a damage-free nursery. Thinking a little outside the box can lead to some truly unique and stylish displays that are 100% temporary and safe.
Here are a few creative, renter-friendly ideas to get you started:
- Decorative Washi Tape: For unframed prints or your child’s own little masterpieces, washi tape is a colourful and gentle alternative. It comes in endless patterns and peels off cleanly, so you can create playful borders and arrangements right on the wall.
- Leaning Art: Never underestimate the chic, relaxed look of leaning larger framed pieces. A beautiful print resting on top of a chest of drawers or a low bookshelf can anchor the room's decor and add depth—without a single mark on the wall.
- Stylish Picture Ledges: A picture ledge is a brilliant investment. You only need to install the shelf itself (which can often be done with heavy-duty adhesive strips), and you get a flexible display area where you can overlap frames and swap out art whenever you like.
These methods aren't just about avoiding damage; they're about embracing flexibility. They give you the freedom to refresh your child’s space easily as their personality develops, making sure their room always feels like their own.
For even more inspiration, have a look at our complete guide on how to decorate a baby room, which is packed with ideas that work beautifully with these damage-free techniques.
Keeping Your Art Secure and Your Child Safe
Getting those beautiful nursery prints up on the wall feels like a huge accomplishment, but the job isn't quite done. In a child's room, making sure every piece is level, stable, and securely fastened is just as important as choosing the perfect spot. This is where decorating shifts into childproofing, ensuring those lovely prints are completely safe for your little one.
The last thing any parent wants is to be constantly straightening a wonky frame or, worse, worrying about a picture falling. These final touches are crucial, not just for the look of the room, but for your peace of mind.

Preventing Tilted Frames and Slips
We’ve all been there – the perpetually crooked picture frame. A slight knock from a toy or even the vibration from closing a door can leave your carefully arranged art looking untidy. Thankfully, the fixes are incredibly simple.
A great little trick, especially for wider frames, is to use two adhesive hooks or strips side-by-side instead of just one. This creates a much more stable base and stops the frame from rocking back and forth. For an extra layer of security, a tiny dab of removable mounting putty on the bottom corners of the frame will gently grip the wall, keeping it perfectly straight.
Matching Hardware to Weight for Ultimate Safety
Now for the most important safety check: making sure your chosen hanging method can comfortably support your frame's weight. Overloading a hook is a recipe for disaster. It risks damaging your art, your wall, and most importantly, it creates a serious hazard in your child's room.
This is especially true for heavier pieces. One study found that heavy frames tilting forward are a common problem in UK homes, responsible for 41% of hanging-related wall damage. In a nursery, this is a huge risk. Imagine something like one of our popular 5kg Superstar Football sets pulling a single, overloaded fixture loose.
Experts discovered that using a two-hook setup with the wire at a 45° angle cuts frame tilt by an incredible 80%. This also boosts stability and reduces the risk of damage by 90%.
Always, always weigh your framed artwork and check the weight limit on your hardware packaging. If your frame is anywhere near the maximum limit, it's much safer to upgrade to a stronger option or use multiple hooks to distribute the load.
Making sure your artwork is secure is a key part of childproofing, but it's only one piece of the puzzle. For a complete overview of creating a safe environment, you might find this a practical room-by-room guide to childproofing your home really helpful.
And for more ideas on using art safely in your little one's space, have a look at our guide to wall hangings for kids' rooms. By taking these extra steps, you can relax and enjoy the beautiful, safe, and secure nursery you’ve created.
Still Have Questions About Damage-Free Hanging?
Even with the best tools and a solid plan, a few questions can pop up right when you’re about to hang that first perfect print. We get it! Decorating your child’s room is a big deal, and you want to get it right.
Here are some of the most common queries we get from parents, answered to help you decorate with complete confidence.
Are Adhesive Strips Really Safe for Painted Walls?
Yes, they absolutely are—as long as you use them correctly! The big brands design their adhesive strips specifically to come off cleanly from most properly painted and cured walls. The real secret isn't in the strip itself, but in following the instructions to the letter.
First up, always give the spot on the wall a quick wipe with a bit of rubbing alcohol. This gets rid of any dust or oils that could weaken the bond. Once you've applied the strip, press down firmly for about 30 seconds, then—and this is the important part—wait at least an hour before hanging anything.
When it’s time for a change, the removal process is key. Never, ever pull the strip out towards you. Instead, grab the little tab and pull it straight down, keeping it flat against the wall. This lets the adhesive stretch and release its grip without taking any paint along for the ride. They’re a brilliant option for renters and homeowners alike.
What's the Best Way to Hang a Gallery Wall Without Making Holes?
For a truly flexible and completely damage-free gallery wall, a picture rail system is a fantastic investment. You just install a single track near the ceiling, and from there you can hang adjustable cords and hooks. It means you can rearrange, add, or swap pictures whenever you like without ever touching the wall again.
But if you're looking for a more budget-friendly approach that's just as effective, you can create a stunning gallery wall using a collection of high-quality adhesive strips.
A top tip from us is to plan your entire layout on the floor first. Arrange your frames until you’re happy with the composition, then use a spirit level to carefully transfer the design to your wall, one piece at a time. This guarantees a professional-looking, hole-free result every single time.
How Can I Make Sure a Picture Is Secure in My Child's Room?
Safety is always the number one priority in a nursery or playroom, and rightly so. The first rule is to always check the weight limit printed on your hanging product’s packaging. Before you even think about hanging anything, weigh your framed picture to make sure it’s well within that limit.
For adhesive hooks, making sure the wall surface is clean and smooth is vital for getting the strongest possible bond. For any art you plan to hang above a cot, changing table, or bed, it's wisest to stick with lightweight, unframed prints hung with decorative washi tape or light canvases secured with adhesive strips to minimise any potential risk.
Finally, just get into the habit of gently checking the fixtures every few months to ensure they remain firmly attached to the wall. For more detailed information, you can always explore our extensive FAQ page for extra tips.
At Pompom Prints, we believe creating a beautiful, personal, and safe space for your child should be a joyful experience. Explore our collection of nursery and children’s wall art to find the perfect pieces for your damage-free decorating project at https://pompomprints.com.